Today's Date:
  • Home
  • About
  • _meet tina
  • _contact
  • _subscribe
  • Create
  • _crafts, hobbies & paint
  • _DIY
  • _Re-use It
  • _wreaths
  • House & Home
  • _Room Reveals
  • _home tour|room by room
  • _exterior
  • _home project list
  • _how-to, tips & Organization
  • _decorating
  • Lifestyle
  • _newsletter
  • _did you know
  • _featured posts
  • _miscellaneous
  • Reading Nook
  • For the holidays
  • _decor
  • _movies & music
  • _recipes

MAPLESTONE

from house living to home loving

  • Appetizers
  • Main Dish
  • Salads|sides
  • Sandwiches
  • Sweet treats
Home Project Lists

Projects Planned for 2022


Every year I have a list of projects for our home that seems to get longer instead of shorter!! Does this happen to you? This list has nothing to do with resolutions Honestly I don't mind that it gets longer because it keeps me motivated.

So without further ado...
Here is the not so detailed list (the master list has every detail written down in my home to-do notebook) of projects I have planned for the upcoming year, to include those unfinished from last year!

  • Replace backdoor & casing - caulk, paint, install new locks, doorknobs & blinds
  • Replace garage door & casing -caulk, paint, install new locks, doorknobs & blinds
  • Paint garage ceiling (2021 list)
  • Replace blinds throughout home 
  • New flooring throughout the home 
  • Update all 3 bathrooms {i.e. tile, lighting, paint, cabinets}
  • Build closet organizer bedroom №4 (2021 list)
  • Repaint bedrooms (2021 list)
  • Build Murphy bed for office/ guest room
  • Update kitchen {i.e. counters, backlash, sink, etc} (2021 list)
  • Organize shed (2021 list)
  • Stain new/replacement wood fence
  • Replace doorknobs throughout home 
  • Sand & refinish wood stairs
  • Repaint concrete screened-in porch
Enjoy your day! ♡ Tina

Sharing: Inspire Me Monday @ Create with Joy Inspire Me Tuesday @ A Stroll Thru Life TuesdayTurn About @ Bluesky at Home All About Home @ Follow the Yellow Brick Home , Thursday Favorite Things @ Katherines Corner Friendship Friday @ Create with Joy , Farmhouse Friday @ County Road 407 , Saturday Sparks @ Pieced Pastimes
Read This Post →
diy Featured

DIY Easy Laptop/Bed Tray


How many of you lay your laptop on your legs or propped on a pillow while sitting in bed, lounging on a chair or couch? I do quite often. And on occasion I would catch my laptop before it would hit the floor! So I started searching for laptop bed trays...there are a lot out there and the price on some were just way to expensive.
Finally after several weeks of looking and complaining I sat down wrote out the dimensions of what I wanted, and ordered these HAIRPIN LEGS (non-affiliated link).

I took my dimensions (25" x 14") and legs to darling hubby, letting him know that the scrap piece of butcher block he had was what I wanted it made out of and left him to preform his magic!🙂 
  1. Cut butcher block to desired size 
  2. Sand
  3. Place legs where you want them, mark where screws go, pre-drill holes (DO NOT mount legs yet if wanting cup holder)
  4. Mark area for cup holder,  then using a 2½ inch hole saw drill to desired depth.
  5. Sand any rough edges from drilling cup holder.
  6. Add legs
  7. Paint, stain or polyurethane 

About 30 minutes later he brought me this...


With something extra...a place to hold my cup! Something I hadn't thought of!

Because of the 2" thick butcher block this thing is heavy which means I don't run the risk of it tipping or getting knocked over easily,  like many of the store bought ones. 

I love the way it turned out.

Happy Building!  
Enjoy your day, Tina ♡

☆ Featured |HERE | HERE |

Sharing: Inspire Me Monday @ Create with Joy Inspire Me Tuesday @ A Stroll Thru Life TuesdayTurn About @ Bluesky at Home All About Home @ Follow the Yellow Brick Home , Thursday Favorite Things @ Katherines Corner Friendship Friday @ Create with Joy , Farmhouse Friday @ County Road 407 , Saturday Sparks @ Pieced Pastimes
Read This Post →
Main Dish Recipe

Crockpot Pork Tenderloin

 I love my crock pot. I actually use my crock pot a lot even during the summer. One thing I love to cook in my crock pot is a pork tenderloin. It's cooked low and slow and just falls apart. 😋 Yum! Today I'm sharing two options for this recipe, a pre-seasoned pork loin or adding her own seasoning to an unseasoned pork loin


Crock pot pork tenderloin

Ingredients

Option 1
  • 3lb pre-seasoned pork tenderloin
  • 1 cup water
Option 2
  • 3lb pork tenderloin
  • 1 cup water
  • Seasoning of choice (i.e. Mesquite Rub, Italian seasoning,etc)

Instructions

Option 1
  1. Pour one cup of water into bottom of Crock-Pot then add pre-seasoned pork loin
  2. Cook on low for 4 to 6 hours, flip twice during cooking
  3. When finished slice and serve with your favorite vegetables
Option 2
  1. Add water to bottom of Crock-Pot
  2. Rub your favorite seasoning into the pork tenderloin and then place in crock pot.
  3. Cook on low for 4 to 6 hours, flip twice during cooking
  4. Slice and serve with your favorite vegetables


Happy  Cooking 
Enjoy your day ♡ Tina

Sharing: Inspire Me Monday @ Create with Joy Inspire Me Tuesday @ A Stroll Thru Life TuesdayTurn About @ Bluesky at Home All About Home @ Follow the Yellow Brick Home , Thursday Favorite Things @ Katherines Corner Friendship Friday @ Create with Joy , Farmhouse Friday @ County Road 407 , Saturday Sparks @ Pieced Pastimes
Read This Post →
Featured Reveals

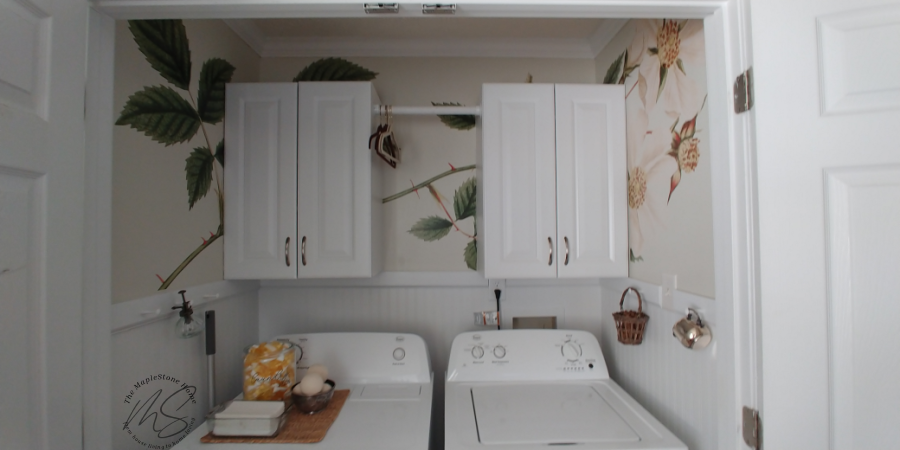
Laundry Closet Reveal 3

Yes you read the title right; this is reveal #3 of my laundry closet and hopefully the final one. If you would like to see the other 2 reveals go HERE 1 | HERE 2


This third redo was done because I needed more storage and I wanted to change things out. So I slowly started removing the wallpaper and the chair rail.


DH hung the second cabinet and added the brackets for the clothes rod. The top half of the walls were repainted. DH and I then hung beadboard paintable wallpaper on the bottom half  measuring from the top of the baseboard to right underneath the cabinets. Once it cured for 36 hours I painted the bottom half of the wall. We used baseboard installed upside down as chair rail (this is a trick I've used throughout our home to make it look more uniform).


The final step was to apply this peel and stick floral decal. DH used tape to place it temporarily on the wall so we could get the placement right before cutting and applying to the wall.


Here is the final look.


SUPPLIES (non-affiliated links)
* beadboard wallpaper (wayfair)
* baseboards, cabinets, dowel rod (lowes)
* paint (valspar - perfect white, sherwin williams - natural @ lowes)
* peel-n-stick wall floral decal (pottery barn)
* decor (etsy, walmart)


Enjoy your day, Tina ♡

☆Featured | HERE |

Sharing: Inspire Me Monday @ Create with Joy Inspire Me Tuesday @ A Stroll Thru Life TuesdayTurn About @ Bluesky at Home All About Home @ Follow the Yellow Brick Home , Thursday Favorite Things @ Katherines Corner Friendship Friday @ Create with Joy , Farmhouse Friday @ County Road 407 , Saturday Sparks @ Pieced Pastimes

Read This Post →
Prev Next
Subscribe to: Posts (Atom)
WELCOME! I'M

TINA

WELCOME! I'M
... the creator & owner of MapleStone; a diy, home decor & lifestyle blog established in 2011. This is where I share crafts, diy's, a few recipes, & happenings in my North Carolina home. Here's hoping this little corner of the blogging world inspires you to go 'from house living to home loving' using what you have, love and your budget allows.

MORE ABOUT ME →

TRENDING

  • Re-use It | World Market Whitewash & Gold Wood Taper Candle Holders
  • Did You Know | History of Tobacco Baskets & Tips {updated}
  • Did You Know | Red Poppies & Memorial Day

BROWSE THE ARCHIVES ↓

  • August 2025 (1)
  • June 2025 (2)
  • May 2025 (5)
  • April 2025 (3)
  • March 2025 (2)
  • February 2025 (3)
  • January 2025 (6)
  • December 2024 (4)
  • November 2024 (3)
  • October 2024 (2)
  • September 2024 (2)
  • August 2024 (4)
  • July 2024 (4)
  • June 2024 (7)
  • May 2024 (4)
  • April 2024 (3)
  • March 2024 (2)
  • February 2024 (6)
  • January 2024 (5)
  • December 2023 (2)
  • October 2023 (1)
  • September 2023 (1)
  • August 2023 (1)
  • April 2023 (2)
  • March 2023 (3)
  • February 2023 (1)
  • January 2023 (5)
  • December 2022 (3)
  • June 2022 (1)
  • May 2022 (5)
  • April 2022 (4)
  • March 2022 (4)
  • January 2022 (4)
  • June 2021 (2)
  • December 2020 (1)
  • March 2020 (1)
  • February 2020 (3)
  • January 2020 (3)
  • October 2018 (1)
  • July 2018 (1)
  • May 2018 (1)
  • March 2018 (1)
  • February 2018 (2)
  • January 2018 (2)
  • December 2017 (1)
  • August 2017 (1)
  • July 2017 (2)
  • June 2017 (3)
  • May 2016 (1)
  • February 2016 (1)
  • January 2016 (2)
  • September 2015 (1)
  • February 2015 (2)
  • January 2015 (1)
  • December 2014 (3)
  • November 2014 (3)
  • October 2014 (3)
  • September 2014 (3)
  • June 2014 (1)
  • May 2014 (1)
  • April 2014 (1)
  • March 2014 (4)
  • February 2014 (1)
  • December 2013 (3)
  • November 2013 (1)
  • October 2013 (1)
  • September 2013 (3)
  • August 2013 (3)
  • June 2013 (2)
  • May 2013 (4)
  • April 2013 (4)
  • March 2013 (1)
  • February 2013 (2)
  • January 2013 (4)
  • December 2012 (2)
  • November 2012 (1)
  • October 2012 (3)
  • September 2012 (1)
  • August 2012 (1)
  • July 2012 (2)
  • June 2012 (3)
  • May 2012 (6)
  • April 2012 (7)
  • March 2012 (3)
  • February 2012 (1)
  • December 2011 (3)
  • October 2011 (1)
  • July 2011 (1)
  • June 2011 (1)
Powered by Blogger.

WANT TO STAY UP-TO-DATE?

Sign-up Here to receive the latest happenings from the blog & the monthly newsletter directly to your inbox.
  • Copyright|Photo Usage
  • Disclaimer
  • Disclosure|Privacy Policy
  • Non-Affiliation|Trademark
© MAPLESTONE • Design by MG Studio
TO TOP ↑