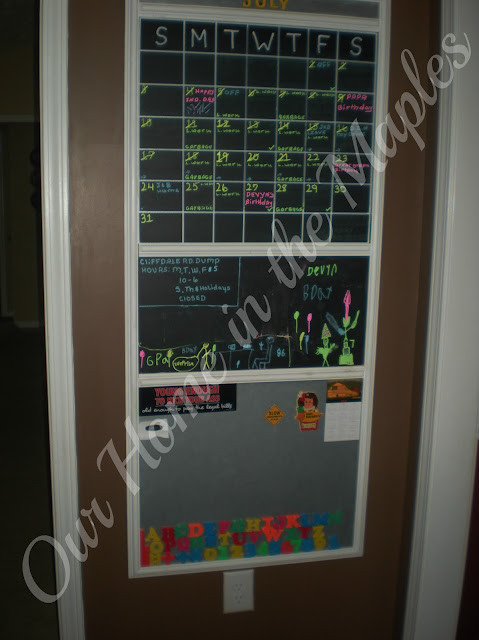
First let me say, "sorry for not having more detail but I did this two years ago." I am going to use the same outline on the homework station for my grandson, so there will be more details when that is complete.
OK......the first thing you need to do is decide where you are going to put this and how big you want it (finished size of mine 5ft X 26in). After that decide how many sections you want, size of each section, and purpose. *NOTE: I have four sections, top is for the month (finished size 2 inches), next is the calendar (finished size 21in X 23in), then the chalkboard (finished size 12in X 23in) and finally the magnet board (finished size 19in X 23in).*
Now that you are finished with that, it is time to buy the supplies:
*Decorative Trim-enough to mount around perimeter and between sections.
*11/2 inch wood letters (I bought 2 packages so I had enough letters for all the months) you can find these at any craft store
*Paint for trim and letters for the months of the year
*Chalkboard paint
*Paint pen-this is used to make the boxes for the calendar, color is up to you, mine are white
*Sheet Metal - size depends on how big you want the magnet area OR you can try the magnetic paint that is out
*Small magnets for the back of the letters
*Paint brushes, tin snips for the metal sheet, saw to cut trim, hammer, finishing nails, ruler and tape measure, pencil , painters tape, level, drill with drill bit no bigger than the diameter of the finishing nails and DO NOT forget the plans you drew.
~~~~~~~~~~
Once you have all this you are ready to begin.
1. Measure out the outside perimeter and mark with pencil, next measure and mark out your sections.
2. Now tape off the area for the chalkboard paint, and paint. We applied 2 coats.
*While you are waiting for the paint to dry you can paint your letters or the trim*
3. Once paint is good and dry, make small tic marks for the boxes on the calendar. Then use ruler and paint pen to draw in the lines. Let dry
~~~~~~~~~~
Now that the paint is dry you can add the trim.
1.Measure and cut your top piece of trim, pre-drill nail holes so the wood doesn't split, and attach using finishing nails, make sure it is level.
2. Now repeat step one for the very bottom piece.
*NOTE: DO NOT attach all trim at one time or you won't get the sheet metal in place*
3. Now place the piece of sheet metal in its designated area, you can use a finishing nail tapped in at an angle to hold it in place until the trim is up.
4. Now back to the trim, use step 1 for the left and right sides.
*NOTE: I have a piece of sheet metal at the very top so we kept the finishing nail in place until we attached the trim for this section.
Now you can add the trim (following step 1) inside the box for each section, make sure to start with the first section and work your way down.
Once finished go through and do any touch-ups needed.
AGAIN I would like to apologize for the lack of illustrations but it was made 2 years ago.

.jpg)

0 COMMENTS
THANK YOU for commenting, ❤